I’ve been implementing Microsoft identity products since MIIS 2003 shipped. This had made me a classic rules extension guy. The code always does what you tell it to do. 🙂
I was excited to try the declarative provisioning and fancy integrated workflow when FIM 2010 shipped. I convinced myself that I was going to do the entire implementation without writing any code. By the end of the first week, I was back to writing code. One of the first things that I attempted to do (something that is a requirement for almost every project I have ever done) was generate a unique account name. FIM just couldn’t do it. I mostly stuck with custom extension code after that. In early 2011 I started using Carol Wapshere’s PowerShell activity (thanks Carol!). This took things to a new level, you can do anything with PowerShell. 🙂
There have been multiple PowerShell activities over the years and I’ve used a few fully custom FIM workflow activities (BlueVault, early FIMWAL, etc…). These custom activities made the implementation much more supportable after the project was completed.
In late 2016 MIMWAL was officially released to the public. MIMWAL now makes virtually every other custom workflow extension obsolete. I’ve been using it exclusively for over a year now and I thought it was time to start sharing my experience.
I apologize for the long intro, but I wanted to clarify some of my issues over the years of working with Microsoft identity products.
Ok, let’s get back to the original problem, generating a unique attribute. It’s surprising how easy this is to do with MIMWAL. Just create a new action workflow and select the MIMWAL: Generate Unique Value function.


I won’t get into some of the advanced configuration options in this post, since they are not needed most of the time.
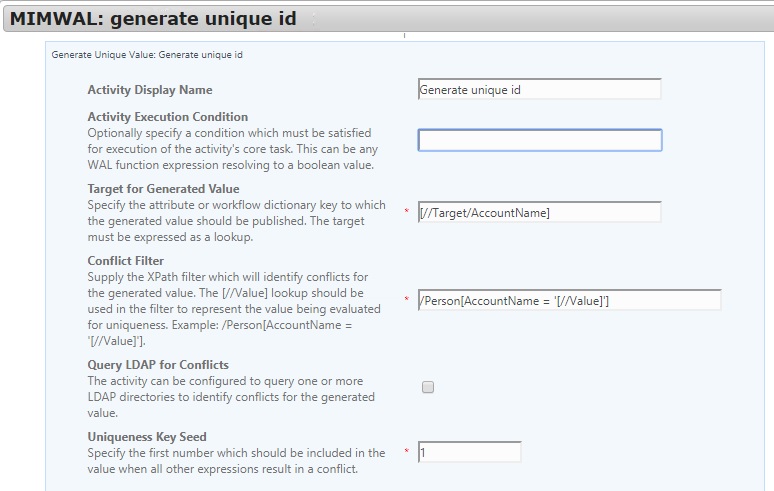
Configure the following options:
- First set the target for the generated value. I’m using [//Target/AccountName] in this case.
- Next set the conflict filter. This is the XPath query that the activity will use to look for conflicts. I used /Person[AccountName = ‘[//Value]’]
- Next set the uniqueness key seed. this is the first number that is added to the end of the unique value if there is a conflict. I chose 1.

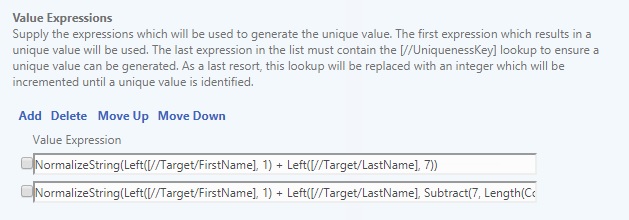
- Next set the value expressions. This decides how the unique value is generated in the first place and what to do in the event of a conflict.
- Initial generation: NormalizeString(Left([//Target/FirstName], 1) + Left([//Target/LastName], 7))
- I’m using the first character of the first name and up to 7 characters of the last name. This is a pretty normal account name standard.
- Conflict generation: NormalizeString(Left([//Target/FirstName], 1) + Left([//Target/LastName], Subtract(7, Length(ConvertToString([//UniquenessKey])))) + [//UniquenessKey])
- For the conflict generation, I don’t want the value to ever be more than 8 characters, so I subtract the length of the uniqueness key from the last name then add back the number at the end.
- Initial generation: NormalizeString(Left([//Target/FirstName], 1) + Left([//Target/LastName], 7))
That’s it! We now have a unique account name that will not conflict with any other account name in MIM.
In a future post, I’ll get into some more advanced features like what to do if all of the current account names are not stored in MIM.
I hope this post can help out a few people. More updates coming soon…
Thanks,
Mark
